Hacked By BALA SNIPER
Hacked By BALA SNIPER
Hacked By BALA SNIPER
By using this website (the “Siteâ€), you agree to the following:
Fangs Are Nasty Things
Evolution gave vampires fangs because they are effective at drawing blood. Fangs can be sharp, and by their nature are designed to hurt. By using this Site—for any reason—you are acknowledging any and all inherent dangers, seen or unforeseen.
That includes any injury, pain, or suffering you cause to yourself.  Unlike real vampires, your fangs are removable. That means they  can fall out when you least expect it. So yes, choking is a hazard. Biting them can damage your teeth. Getting punched in the face because you freaked someone out at a party while wearing them can exacerbate the damage.
Finally, just making these fangs can be dangerous unless you faithfully follow the instructions. By using this Site, you acknowledge that you have familiarity with the tools and procedures involved.
Limitation of Liability
This Site, including its affiliates, partners, owners, etc., shall not be liable for any special or consequential damages that result from the use of, or the inability to use, the services and products offered on this Site, or the performance of the services and products. We’re particularly not liable to any trick-or-treaters you scare.
For Educational Purposes Only
This Site is intended for educational purposes only. We are not responsible or liable to anyone who obtains fangs that were produced after someone used this Site.
Copyright
The entire content included in this Site, including but not limited to text, graphics, or code is copyrighted as a collective work under the United States and other copyright laws, and is the property of INFODONTICS, LLC. ALL RIGHTS ARE RESERVED. Permission is granted to replay the videos on this Site over and over again at dental parties, but that’s it. Any other use, including but not limited to the reproduction, distribution, display or transmission of the content of this site is strictly prohibited, unless authorized by INFODONTICS, LLC. Basically, if this shows up on Youtube, or some other website, there’s going to be a problem. You further agree not to change or delete any proprietary notices from materials downloaded from the site.
Trademarks
All trademarks, service marks, and trade names used in the Site are trademarks or registered trademarks of INFODONTICS, LLC.
Term; Termination
The provisions of this Terms of Use become effective at the moment you access this Site, and remain in effect indefinitely, unless INFODONTICS, LLC makes explicit any alterations of any provision of this Terms of Use.
Notice
INFODONTICS, LLC may deliver notice to you by means of e-mail, a general notice on the site, or by other reliable method.
Miscellaneous
Your use of this Site shall be governed in all respects by the laws of the state of Texas, U.S.A., without regard to choice of law provisions. You agree that jurisdiction over and venue in any legal proceeding directly or indirectly arising out of or relating to this Site shall be in the state or federal courts located in Dallas County, Texas. Any cause of action or claim you may have with respect to the Site must be commenced within one (1) year after the claim or cause of action arises. INFODONTICS’s failure to insist upon or enforce strict performance of any provision of these terms and conditions shall not be construed as a waiver of any provision or right. Neither the course of conduct between the parties nor trade practice shall act to modify any of these terms and conditions. INFODONTICS, LLC may assign its rights and duties under this Agreement to any party at any time without notice to you.
Indemnification
You agree INFODONTICS, LLC and www.howtomakevampireteeth.com, its officers, directors, employees, agents, and licensors from and against all losses, expenses, damages and costs, including reasonable attorneys’ fees, resulting from any violation of these terms and conditions or any damage you cause.
What do we use your information for?
Any of the information we collect from you may be used to improve our website (we continually strive to improve our website offerings based on the information and feedback we receive from you).
Do we use cookies?
Yes (Cookies are small files that a site or its service provider transfers to your computers hard drive through your Web browser (if you allow) that enables the sites or service providers systems to recognize your browser and capture and remember certain information
We use cookies to compile aggregate data about site traffic and site interaction so that we can offer better site experiences and tools in the future. We may contract with third-party service providers to assist us in better understanding our site visitors. These service providers are not permitted to use the information collected on our behalf except to help us conduct and improve our site.
Do we disclose any information to outside parties?
We do not sell, trade, or otherwise transfer to outside parties your personally identifiable information. This does not include trusted third parties who assist us in operating our website or servicing you, so long as those parties agree to keep this information confidential. We may also release your information when we believe release is appropriate to comply with the law, enforce our site policies, or protect ours or others rights, property, or safety. However, non-personally identifiable visitor information may be provided to other parties for marketing, advertising, or other uses.
Third party links
Occasionally, at our discretion, we may include or offer third party products or services on our website. These third party sites have separate and independent privacy policies. We therefore have no responsibility or liability for the content and activities of these linked sites. Nonetheless, we seek to protect the integrity of our site and welcome any feedback about these sites.
Responses to Email Inquiries
When Visitors send email inquiries to us, the return email address is used to answer the email inquiry we receive. We do not use the return email address for any other purpose and do not share the return email address with any third party.
Childrens Online Privacy Protection Act Compliance
We are in compliance with the requirements of COPPA (Childrens Online Privacy Protection Act), we do not collect any information from anyone under 13 years of age. Our website, is directed to people who are at least 13 years old or older.
Your Consent
By using our site, you consent to this online privacy policy.
Changes to our Privacy Policy
We reserve the right to revise, amend, or modify this policy and other policies and agreements at any time and in any manner. If we decide to change our privacy policy, we will post those changes on this page.
Contacting Us
If there are any questions regarding this privacy policy you may contact us by the listed e-mail address.
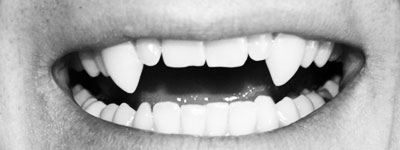
Vampire teeth come in all shapes and sizes. Use this page as inspiration for your own horrifying set of fangs. If you know of any terrific movie vampires that you think we should include please let us know! Also, if you have a photo of your own that you’d like posted, you can upload them here. We’d love to see them!
We’ve provided this page for those that decide they’re just not in the mood to make their own set of teeth. Â Below you’ll find a list of websites and products related to vampire fangs and other accessories. Â Follow the links to find out where you can purchase these on the web. Â If you another great resource that we haven’t listed, contact us and we’ll post it as soon as we’re able. Â We’d also love to receive any feedback you might have on the products listed here. Â Enjoy!
We’ve made this process as simple as possible, but there are still a good number of steps with a lot of room for error. We’ve listed a few of the most common issues you may have when making your vampire teeth and possible solutions. If you have a problem not listed here, send us a message through our contact page and we’ll try to help you get to the bottom of it.
Voids are usually caused by air bubbles trapped in the acrylic. Flowing the acrylic into the impression very slowly and ensuring that the acrylic reaches the deepest part of the impression will prevent most large voids. Small voids like the one pictured below can easily happen if air gets caught in the acrylic while mixing and sometimes it’s just going to happen no matter how hard you try to prevent it.>
Patching the void can be quickly done by dabbing some fresh acrylic in the area. This is most easily done by taking some sort of small brush that will wick up a small amount of acrylic liquid. We used a spare paintbrush from a kids’ water color set. Dip the paintbrush in your bottle of acrylic liquid, then touch the tip of the brush into your bottle of powder. A dab of acrylic will form on the brush tip as shown below.
The powder that sticks to the end of the brush will quickly absorb any surrounding liquid. You should have a nice smooth bit of acrylic which you can paint onto any voids. Let it set and polish again.
If you’ve made all the adjustments you can think of to the exterior surface of your fangs and they’re still not fitting right (rocking, not seating all the way, etc.) you may have a problem with the internal surface. You need to be careful when adjusting this area because if you adjust too much, you’ve lost the custom-fit nature of your fangs.
One common reason for a poor fit comes from issues with your model. For example, if you have a sharp canine tooth, the very cusp tip may become blunted with regular handling of the cast. When you make your fangs, acrylic will fill the spot where your cusp tip should be. This will keep the fangs from seating completely.
This is corrected by taking a small bur in your rotary device and grinding out the inside of your fang at the cusp tip. Remember, keep it minimal! If you don’t have a rotary device, you could attach a very small piece of sandpaper to a long thin object, like the manicure tool we showed you earlier, and grind it out by hand. See the next topic if you have more difficulty.
If you’re still having difficulty getting your fangs to seat properly, you might want to reline them. One great thing about acrylic is that you can add new acrylic and it will bond to the old.  It might have a slightly different color or a line where the new material meets the old, but you should be able to make things look pretty darn good. This is a great technique for making sure you’re getting the best fit you possibly can, but only attempt this if you’ve read all of our instructions carefully. If you are not an adult, make sure you do this with adult supervision.
Make sure your fang is dried. Mix some acrylic and fill the fang. Stick the fang on your tooth and seat it as fully as you can. Some of the acrylic should ooze out. Leave the tooth in place for just a few seconds – just until the acrylic has become a little rubbery. Quickly remove the acrylic at this stage.  Don’t forget, acrylic can become extremely hot when it sets up. You may burn yourself if you can’t remove the fangs in time!

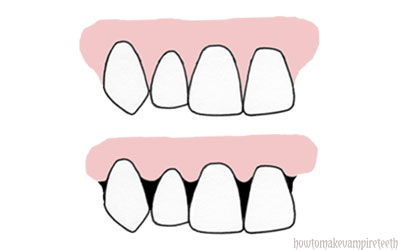
Also, if you let it sit too long, it will harden completely and if that bit of acrylic that oozed out has gone between your teeth it will be very difficult if not impossible to remove the fang. Typically, your gums will fill in all the spaces around your teeth (top image). Â You might find however, that you have gaps around a few or all of your teeth (bottom image). Â Relining your fangs in this situation could become very risky. Â If the acrylic is able to flow between your teeth you should not attempt a reline. Â The above diagram shows a set of teeth with normal versus receded gums. Â The acrylic could easily flow into those areas and lock on. Â A dentist might be needed to remove the fangs in a situation like that. Â Here are some real life examples of people that should reconsider relining their teeth – click here, here, here, or here. Â The same applies if you have any dental bridge-work as well.
When you put the fangs on they’ll likely stay on quite well while making normal movements with your mouth like smiling and talking. If you find that they don’t stay on very well at all, examine the fit. If you goofed up anywhere along the way (distorted impression, defects in model, distorted acrylic, etc.), that may be your problem.  Refer to our Troubleshooting page for more tips.
If the teeth fit pretty well, but just don’t stay on as well as you’d like, it might be that your teeth have a shape that is not too favorable. If this is the case, you can try some type of fixative. Try putting toothpaste in the fang and see if it helps. You could also try some temporary dental cement. Both these items can be found in the dental or pharmacy section of most stores.
In the above picture we’ve used temporary dental cement to fix our fangs in place. Â You’ll notice that the cement gave the teeth a white, opaque appearance and that it’s not seating completely. Â To prevent this, only put the cement on the back side of the tooth and keep it pretty minimal.
If you decided to add a little bulk to the back side of those teeth they should now look like the above pictures. Â This is our preferred way to ensure a great fit. Â If you didn’t add this material a few steps back (step 3) you can still do it now. Â Acrylic is actually very good at bonding to itself. Â Put some vaseline all over the teeth neighboring your fangs on your model, stick your fangs back on it, mix up some new acrylic, and add it to the back side of your fangs and the teeth next to them. Â After it has set up, remove the fangs, check that the new material is firmly attached to the old material, and polish things up.

When you’re all done, stick your fangs on, find a friend or small child to scare, and give them your best vampire hiss. You’ve successfully created your custom set of vampire teeth! Keep your models for future use. You’ll be able to replace your fangs more easily when needed or you can make a new variation of fangs.

READ THE FOLLOWING PARAGRAPH! Â THIS IS VERY IMPORTANT!
No matter how well your teeth stay on, show some caution while wearing them. For example, if someone tells a joke at your next vampire convention, it wouldn’t be wise to laugh out loud with your head thrown back. A fang could easily slip right down your trachea and an emergency department is going to have a difficult time locating an acrylic fang deep in your lungs. Do not eat with your fangs, do not sleep with your fangs, etc. Do not wear your fangs for extended periods of time either. Your bite is going to be slightly out of place with these fangs on and it may begin to irritate your teeth and cause some sensitivity or aching. Also, if you wear your teeth for multiple hours per day for extended lengths of time you may begin to see movement or drifting of your teeth! Most of all, withstand the temptation to bite the neck of a member of the opposite sex. These teeth are very strong and can easily puncture skin if you’ve sharpened them. We hate to break it to you, but vampires are still considered a myth! No matter how cool you feel wearing these puppies, you will not acquire any vampire abilities by wearing them!!
When you remove your fangs, you’ll likely find that you’ve got a whole lot of cleaning up to do. Â Check for any major repairs like voids or distortions. Â Our Troubleshooting page has methods for fixing any blaring errors you see. Â Skip ahead here if you need to. Â If everthing looks pretty good, you can begin polishing. Â Any excess acrylic can be removed very quickly with a power rotary tool commonly called a Dremel (Dremel is actually the most popular brand of rotary tools). Â Focus on the visible side of your teeth. Â If you want to trim off the acrylic on the back side later, you certainly can, but you might find that extra acrylic helps to keep your fangs in place.
We got this Black & Decker rotary tool at Walmart for around $30. You might need to pick up a bur and a corresponding collet if a useful one doesn’t come in your kit. You could use either a bur like the one shown in the picture above for a good result.  Dremel’s can be a very useful tool for dozens of other projects, so if you’ve thought of buying one this might be the perfect opportunity.
The other way to trim up your teeth is with an emery board – after all, this is nail acrylic. Chip off any large pieces and then start refining your teeth until they look just the way you want them. Keep a mirror handy so you can try them on your teeth to evaluate the final result. Once you’re done, polish them up with the finest surface of your emery board.
The polishing step may take a while depending on the tools you have handy and how much you need to trim your teeth. Â Have a little patience until you’re happy with the finished product!

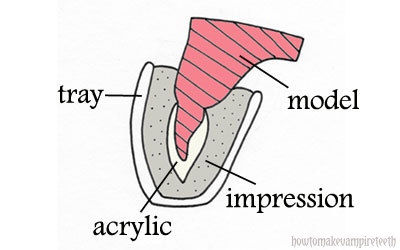
Next, remove the clay fangs from your teeth which will return the model to its original form. You’re going to stick this model into the impression you just took of the model with fangs. If you think about it, there should be a space between your teeth and the impression material (where your sculpted fangs were). We’re going to pour acrylic into the impression and then place the model in after it. Once the acrylic sets up, you’ll pull it out, take the new acrylic teeth off the model, and you magically have vampire fangs!
First though, take some Vaseline (also known as petroleum jelly or petrolatum jelly) and smear a thin layer on your model. Use a Q-tip to make sure the Vaseline isn’t forming globs in the little nooks and crannies around your teeth. This lubrication will make sure your soon-to-be acrylic fangs can be easily removed from the model.
Next comes the acrylic. We’ve got to mix enough acrylic powder (polymer) with acrylic liquid (monomer) so that the acrylic will set up correctly, but it needs to be runny enough to flow into the impression (similar to the stone mixture). Read the instructions that came with your acrylic of course and then mix it however you feel comfortable.
Our preferred method is to pour a little liquid into a mixing cup first.  Make sure this is a disposable cup and that it does not melt away when it comes in contact with the acrylic (we used the bottom of a water bottle).  Then add a little bit of powder at a time. Mix that powder in (with a disposable mixing stick!) and check the consistency of your mixture.
When you lift the stick from the mixture you’ll want a string of acrylic to drag upwards about an inch before dropping back into the bowl. If its thicker than this, add some more liquid. If it’s too runny, add some more powder. We start with the liquid because we find the powder a little easier to control. You’ll definitely want to experiment with the acrylic before making a final go at your fangs. Try to achieve the correct consistency and pay attention to how long you have to work with the material before it sets up.
A definite sign that the material is hardening correctly is the temperature. Most acrylics set up by an exothermic reaction which means that it becomes very warm to the touch. Some materials become so warm that they would burn your mouth were you to apply the acrylic directly to your teeth, not to mention the fact that you’d probably have a big chunk of acrylic locked onto your teeth by the time you were done.
When you’re ready, pour enough acrylic into your impression to fill the teeth that will have fangs. Just like the stone, make sure it runs slowly into the deepest parts of your impression without trapping any air bubbles that will leave voids. Now stick your un-modified and lubricated model into the impression and make sure its seated fully. Watch the leftover acrylic in your mixing bowl to gauge how completely setup your fangs are.

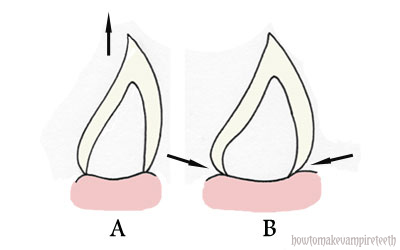
You may want to removed the fangs when the teeth are a little rubbery. It will make separation of the fangs from the model a little easier. Also, your teeth might have some undercuts that will make it impossible to remove if the acrylic hardens completely, unless you were to grind out the model – not fun. Check out the diagram above.  With no undercuts (A), the fangs come off easily. With undercuts (B), the fangs will become locked. Most canines are shaped in a way that you won’t have a big problem with this, but you’ll want to closely examine your own teeth’s anatomy just to be safe.
Now that you have the  model of your teeth looking pretty vampirish it’s time for yet another impression! We’re going to take an impression of your  model (for reasons we’ll explain later), but there is one important step at this point. Get a bowl of soapy water (dish soap would work best) and gently place your cast and molded fangs into it. Let it sit for at least 10 minutes. This will enable you to take an impression of the model without the impression material sticking to the cast. Don’t forget this step!
Next mix up the impression material just like we did before, put some in your custom tray again, and very carefully stick your model into the goop. Let it set up and remove the model.  The impression material should be thin enough that it won’t smoosh your fangs as you carefully press it into the tray.  Don’t push it all the way through the impression material or the tray will definitely do some smooshing.
You may have sculpted a much more intricate and fragile design with your teeth. Â If the impression mashes your sculpted teeth you might want to consider baking the model. Â One great feature of Sculpey clay is that it can be hardened with a quick trip to the overn. Â The only drawback to this is that you won’t be able to remove the fangs from the model, which you’ll need to do later. Â If you have a second model of your teeth this won’t be a problem.
Examine your impression once again. Make sure you have a very detailed impression around your fangs. If you used a plastic custom tray, make sure there are no voids that expose the tray. In the last step you’ll use acrylic to make your fangs and if the acrylic comes in contact with the tray it will fuse to the tray and likely ruin all your hard work.